Posts

Guildmarm/Sophia WIP

Image
 Hi everyone! ^^ Long time no see! I've been super busy with work and moving in, but I'm trying to balance my life now so that I have more time to actually be creative and work on costumes a little more. I try to make progress everyday, doesn't matter how small. Sometimes it's literally just one layer of paint or a little bit of hand stitching, but it's better than nothing, right?  Today I wanted to show off some progress I've made on Guildmarm or Sophia from Monster Hunter 4. It's honestly about time I make a MonHun-cosplay! Also about time to do a cosplay makeup test! Haven't practiced cosplay makeup in such a long time and it shows... ^^'' Makeup is all about practice after all, heh. Sadly I don't have all the progress pics I needed, but here's at least some of them. Enjoy! The base jacket... Added details! (missing lining) The jacket was definitely the most difficult part so far! Not that I've done that much, but regardless! The l...
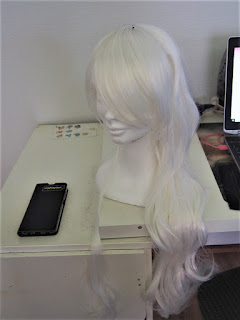
How to make your wig fluffy/thick!

Image
 It's another wig-related post~ Whoooo~ I was working on Impa's wig (more on her later) one night. I originally thought I could use Paya's wig, but her hair is way shorter and again, I wasn't really happy with the styling anyway, so I bought a "dream line" wig from Punanaamio. Yeah I know, literally all finnish cosplayers are probably cringing right now, but on their website they promised these wigs are heat resistant, so I decided to give it a go. The wig arrived pretty fast, so props on that! The wig itself though, was very thin, though isn't anything new with white wigs, so instead of buying another one, I wanted to try crimping this bad boy! The wig I bought was this one  in white btw. I've seen UmbraWigs/Maddie  crimp the wigs to get extra volume, so I wanted to give that a try too. I absolutely adore her work, she gives such an inspiration boost. <3 This was the wig. It's a little shiny, but since I was going to "destroy" the fib...

Breaking the radio silence

Image
Hi everyone! It has been a while since I posted last time and I honestly feel a little sad about it, but no can do really... In this post I just want to share some stuff that I've been doing, plus some plans for the future. It's a little different from the usual stuff I do here, so buckle up! So obviously not much cosplay progress here. I'll give an update on Paya later so at least there's that to look for. I've been working for a couple of months as a cook, but now the restaurant has closed for a while. It'll be a few months until it opens again so I try to keep myself busy by working in a super market when needed and I'm moving in with my bf soon. The apartment we're trying to get is being renovated currently, so we'll hear about that when it's done. Honestly I'm looking forward to it, my room is quite small and I have a lot of stuff and nowhere to store them. This of course also means that costume making is quite limited. While I wait I st...

re-Birth of Chizuhuuru

Image
Yes! Chizuhuuru! Rise again from your slumber! "no I sleep UwU" One day I decided to pick up my brother's PSP and play Hakuoki: Demon of The Fleeting Blossom, and dang did I get inspired by this once again. (plus got Hakuoki: Edo Blossoms on Steam while it was on sale, fuck yeah!) My bf got interested in it and wanted to check out the anime, so far he has enjoyed it and is considering cosplaying from Hakuouki with me. :D This is giving me such a boost, so I dug my old Chizuru cosplay, took a closer look at it and got to work. I only had the hakama and pink kimono for her (+ wig), everything else donated materials for other projects.  Hello Chizuru my old friend... Oof. The was so much that needed to be done, but I started by taking the kimono apart, iron the pieces and take a look at the measurements, cut and zigzag and finally sew together.  The white under kimono I took from my old Kosuzu cosplay. The kimonos collar had painted design on it, but I have extra fabric for ...

Papaya Girl part 3

Image
Hello! Back to Paya! This time I started working on the jacket. It's pretty much kimono-like, but the red collar goes criss-cross applesauce in the middle. I took a look at other cosplayers to see how they have done it just give me an idea how I should approach it. Reference I hope you see what I mean about the collar.. The fabric itself provided from dad's old winter suit that he gave me for material donor since he didn't have any use for it at all. I'm very thankful for that! The winter suit is basically just large coat and pants, it was somewhat easy to pattern that. I just needed to chip off a few cm's from here and there and that was it actually. :D  The coat, in pieces, yeeted on the floor... testing.. fitting Once I was okay with the fitting I made the details, the red stripes on the sleeves, the "cape" on the back and the collar. The sleeve details I just winged basically. The first version I made was too short (only a little over my shoulder) and ...